|
1. Place your
router's power switch in the off position.
2. Following
the instructions in your Cisco® Owner's Guide that describes how
to locate your router's flash memory expansion sockets.
3. Before touching
any electonic components or opening the package containing your
new module(s), make sure you first touch an unpainted grounded metal
object to discharge any static electricity you may have stored on
your body or clothing.
4.Handle your
new module(s) carefully; do not flex or bend the module(s). Always
grasp the module by its edges.
5. As shown
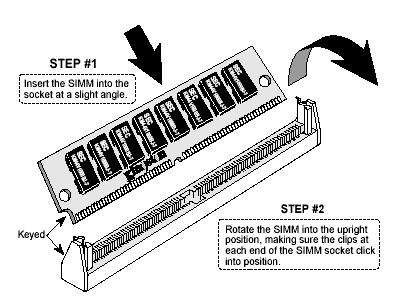
in the illustration, the module and the expansion sockets are keyed.
A small plastic bridge in the socket must align with the curved
notch in the module. The bridge insures the module can only be plugged
into the scoket one-way.
Note: The illustration shows a vertical
(90 degree) memory expansion socket. Some motherboards have memory
expansion sockets angled at 30 or 45 degree. However, the basic
module installation procedure is the same for both vertical and
angled memory expansion sockets.
6. Insert the
module into the socket at a slight angle. Make sure the module is
completely seated in the socket. If you're having problems inserting
the module into the socket, stop and examine both the module and
the socket; make sure the notch in the module is properly aligned
with keyed plastic bridge in the socket. Do not force the module
into the socket. If too much force is used, both the socket and
module could be damaged.
7. Once you
are satisfied the module is seated properly in the socket, rotate
the module upwars until the clips at each end of the expansion socket
click into place.
8. After all
modules have been installed, close the router, plug in the AC power
cord, and reinstall any other cables that may have been disconnected
during the installation process.
|

